Rear Hub Oil Seals
Rear Hub Oil Seals
In a previous edition of the Historic VW, I described how I tackled the task of replacing the rear hub oil seals on my 1952 Beetle “Val”. What my written account lacked at the time was a good exploded diagram depicting the various components concerned. I don’t intend to repeat my description of the entire replacement process but to add some qualifying statements using the diagram below.
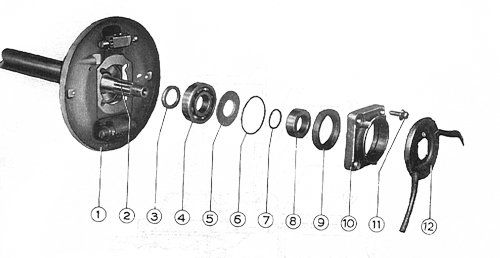
Item (12) is the oil deflector pipe, which is attached to the inside of the brake drum by a metal tab. Usually this comes off the hub when the brake drum is removed. If the oil seal does fail then its task is to deflect the oil away from the brake linings and out of the hub through a hole in the brake drum itself. This ingenious part was discontinued after July 64 when a different arrangement was adopted (see below).
Item (10) is the oil seal housing (or cover), which is different for cars before and after August 1964. The cover for the later cars has a drain hole, which lines up with a hole in the brake back-plate (1) thus allowing any leaking oil to escape from the drum. In these instances there a paper gasket fitted between the oil seal cover and the back plate. This is not needed for the earlier cars. From July 64 an oil thrower, a simple metal washer, was positioned on the axle shaft immediately behind the oil seal cover and in front of the oil seal.
The oil seal cover is held in place by four very substantial bolts (11). The heads of these are easy to damage and since they are recessed, a socket is by far the best tool to use on them. When replacing these bolts, they must be tightened evenly to 43 ft lbs., which is quite tight.
Item (9) is the oil seal itself, which I believe has the same part number for all Beetles of our era. The old oil seal can be removed from the cover very carefully with a screwdriver and a hammer but the new seal must be put with a hydraulic press. This needs to be done very precisely and the seal must be lubricated with oil to stop it being damaged. Fitting the new seal is one of the most critical parts of this operation and I always get my local garage to do this task for me.
Item (8) is the infamous metal collar or outer spacer, which the oil seal moves upon. The condition of this determines if the seal will do its job (or not). In my previous article on the subject I described what a pain this can be to remove. It has to be removed to replace item (7) the small “O” ring so, unless it is other than totally pristine, fit a new one. The other (large) “O” ring (6), which goes between the oil seal cover and the brake back-plate, must also be replaced.
The rear wheel bearing (4) is a heavy-duty ball bearing and very durable but if it looks damaged or worn this should also be replaced. Another spacer (3) sits behinds this but you will not be aware of it unless the bearing is removed. Removing this wheel bearing can be a bit of a pantomime.
The official VW tool for the job is an ingenious bearing puller with jaws that fit between the balls in the bearing cage. The bearing can be coaxed off carefully by tapping with a hammer and with a bit of manipulation of the axle shaft (2). You must be extremely careful not to damage the axle shaft and especially not the splines that locate the brake drum, or the threads, which hold the axle nut.
Most of the parts that are needed for this work can be bought in a repair kit, which will include the paper gasket and which may not be needed in all instances. Alternatively you can buy the individual items from your VW agent if you need specific items only.
Some workshop manuals imply that this operation can be done without removing the brake shoes. This is true, but I can almost guarantee that oil will leak out of the hub so I maintain it is prudent to remove the shoes to prevent contamination. One manual I have read suggests that the brake back plate should also be removed but, in my view, this is not necessary and would involve disconnecting the brake pipe, causing you even more work.
Providing you have been careful and thorough all the bits should go back a lot easier than they came apart and that particular annoying puddle of smelly oil on the garage floor will become a distant memory.
When the operation is complete don’t forget to:
(i) Retighten the axle shaft nut correctly and fit a new split pin
(ii) Check/adjust the foot and hand brakes.
(iii) Top up the gearbox oil
Some useful part numbers:
| Rear spacer (3) | 111 501 281A |
| Wheel bearing (4) | 311 501 283 |
| Washer (5) | 111 501 286 |
| Large “O” ring (6) | 113 501 219A |
| Small “O” ring (7) | 111 501 296 |
| Metal collar/spacer (8) | 113 501 3031 |
| Oil seal (9) | 111 501 315 |
| Paper gasket for later cars (not illustrated) | 211 501 315 |
Mike Johnson (Editor)

Copyright © 1974-2024 The Historic Volkswagen Club