SecondTimeAround
Second Time Around
by Mike Johnson
I am pleased to report that your Club Secretary has taken a small step towards credibility by once more becoming the owner of a Historic Volkswagen. To my shame it is over 6 years since I owned such a vehicle and 14 years since I have driven a beetle on a regular basis. Other demands on my time and finances have meant that only now can I entertain such an enterprise once more. About 3 years ago I had a brief encounter with a certain 1949 beetle but since I later discovered that redundancy and early retirement were almost inevitable we had to quickly part company.
Since the New Year I had been pondering over what beetle to buy, anything from 1952 to about 1970 was to be considered. I already have a daily driver and also an early water-cooled Volkswagen, which I have lovingly restored over the past six years, so having yet another car to drive on a regular basis seemed rather pointless. In the end the choice came down to either a 1500 or another split rear window. It was a split that got the final vote.
There were several cars for sale at that time but most were concours vehicles and would not cure my craving to have a car to work on. I did not fancy doing a last nut and bolt restoration on another rotten wreck, which would have taken years and a fortune to complete, so my choice was becoming limited. Many of you may already know my views on originality in that safety and to some extent practicality must come first on today's roads. This meant that notions of cable brakes and a crash gearbox would not be entertained. Also to get in and out of my garage, which is at the back of my house, I have to negotiate a very narrow driveway. At one point this is less than seven feet wide and there is a badly placed drainpipe which just loves exterior mirrors. This meant left hand drive was not an option, especially since I have never driven such a vehicle and had no intention of learning in a car upon which I wanted to restore.
After all these restrictions in choice it looked as if there was only one split rear window beetle in the entire world that would suite my needs. This was of course the 1952 split 409 VAL which I first owned in 1984, took 8 years to restore and in a fit of madness sold and regretted doing so ever afterwards. I had converted this car to twelve volt electrics for better starting and lights and fitted radial tyres on 15 wheels for better road holding. The original floor pan had been so rotten it had to be scrapped, so I had sat "VAL", as she was named, on the chassis of a 1954 oval, which gave her right hand drive and hydraulic brakes.
I had sold the car in March 1996 to another club member, in fact the same individual I had bought the car off some 12 years earlier. He had kept her just over a year and then sold her to a student from Yorkshire. For the next 18 months the car had to endure a very hard life as a daily driver and apparently without even the luxury of a garage. At some time the engine overheated and pickled the paintwork on the rear panel, which was left, and the metalwork allowed to rust. When I saw the car at Stanford Hall in 1997 it looked terrible: stone chipped, patches of rust and dents on the bodywork, rusty wheels and bumpers and one of the tyres I had fitted was almost bald. I had tears in my eyes for a time and wondered "what have I done". Sadly if you restore a car, and sell it on, it seems you must be prepared to face such an eventuality. I know some would dismiss my reaction as sentimental nonsense and say it is only a car and not your problem any more, but having lavished 12 years of tender care on the car and to see it in such a sorry state was heartbreaking.
Fortunately things were to take a turn for the better as in 1998 the car was bought by club member Tanya Wray and her husband Dave who have treated the old girl far more sympathetically. I was delighted to see her make the long treck to Camberg in 1999. She took part in the "Return to the Fatherland" trip arranged by the Americans and I have seen photographs of her at Wolfsburg and other famous VW landmarks. Although the car was far from immaculate, she was admired by the Americans as, whereas their vehicles were all in better than original condition, VAL looked like a 50 year old beetle. The irony of this situation is that I would never have dared take the car all that way myself but without my efforts over all those long years the car could never have made the epic journey.
I hadn't seen the car since Camberg so I wondered what had happened to her. I knew that that she had had a change in registration number to FSL 160 and since Tanya and Dave were devoted owners, the prospect of them selling the car seemed rather remote. After much agonising I decided to ask them, not with a sudden telephone call but in a carefully worded letter to give them more time to consider the matter. The letter was only a few paragraphs but it took over a week to perfect. I knew that if I got it wrong my one and only chance might be blown. Having at last summoned up the courage to post the letter I spent a few days waiting and then one evening the expected phone call came. To my joy Tanya was prepared to sell the car. She and Dave were restoring an old farmhouse, which was proving to be a bottomless pit where money was concerned and my enquiry could not have been better timed. The only other alternative for them was to moth-ball the car for several years until they could afford to have it restored. They were happy to sell it to me knowing it would be going to the best possible home.
The following Sunday found me engaging warp drive and making the 150 miles trip up the A1 to Yorkshire to see the car. Tanya and Dave's directions were impeccable and after just 2 and a half hours I was at my destination. Their farmhouse is fantastic and the facilities they have in the yard were those some VW enthusiasts would kill for. They have two double garages and what looked like an old milking parlour or stable block which gave covered accommodation for a further 4 vehicles. VAL shared a garage with their immaculate Porsche Speedster replica and there was an early split screen van in the milking parlour under restoration. Having not seen the car for several years I held my breath as the garage door was opened. Thankfully I was pleasantly surprised.
When VAL left me in 1996 there wasn't a single stone chip or rust spot on her but I already knew this was no longer the case. The years had taken the toll of her paintwork but the interior, despite being a bit grubby was fine. Since I last owned her, the car had done over 50,000 km, so how about that for an extended road test! Underneath, the chassis was almost as good as the day I finished it. After it had been painted, a whole five-litre can of Waxoyl had been sprayed on the underside of the floor pan and had kept the stones, grit and damp at bay. Similarly the underside of the wings had received a thin coating of bitumen underseal and a deluge of Waxoyl and were also rust free. In contrast the painted and therefore vulnerable edges and top sides of the wings were stone chipped and with the inevitable rust spots. During the original restoration process the car had undergone a tremendous amount of welding which can stimulate more rust. If great care is not taken a so-called restoration will need to be repeated in a few years as the rust returns, but not apparently in this case.
After a short discussion a price was agreed. I asked Tanya if she really wanted to sell the car and she was adament the answer was "no" but under current circumstances she had no alternative. She didn't want the poor car to spend any more years entombed in a garage so the deal was struck.
I must admit on my way home I had a smile on my face, and tear in my eye again, but reality was beginning to dawn on me. How was I going to get the vehicle home! It was a non-runner due to leaking rear hub oil seals and the MOT had expired well over a year earlier. I didn't know anyone who had a car with a suitable trailer so it looked like I would have to enlist some professional help. There were only really two options, either I would have to hire a transporter and move the car myself, or pay someone to do it for me.
Many years ago I had gone down the first route and knew that it is not as simple as it seems. Some of the vehicles for hire have a hand operated winch so you really need help from a second person. Also the conditions of hire and the distance involved would have meant that I might have to pay for two days hire. I wasn't prepared to pay someone the proverbial back hander to move the car using the "works vehicle" or some similar scenario as that can cause complications with insurance.
In Practical Classics Magazine there are several adverts for organisations who move classic cars as a business. I found a chap called John Blythe who is based in Boston, Lincolnshire, which was roughly about half way between my home in Cambridge and the car in Yorkshire, so I gave him a call. Having explained the situation to him, he said he could do the job within the next 3 to 4 days and needed to work out the mileage to give me a quote. As it turned out, the journey was 330 miles which translated into £165, which I thought was very reasonable. It would cost him at least £40 in fuel alone plus about 6 to 7 hour of his time so the offer was accepted. He had a nice Mercedes transporter complete with an electric winch and the all-important £500,000 all risks insurance policy as back up. I just had to pay the money and not put up with any hassle.

A few days later and within 2 minutes of the anticipated time of arrival, VAL was sitting safe and sound outside my house on the transporter. Mr Blythe is a retired garage owner who moves classic cars as a hobby, hence the excellent value for money and friendly service. The following day he was driving to Manchester to pick up a Jaguar XK150 and was to follow the owner who was driving an Aston Martin down to Oxford to have the car serviced. They would then take the Jaguar on to its destination and he was to then to take the owner back home. From his base in Lincolnshire he has travelled to destinations as far as Elgin in Scotland and Lands End. With the longer journeys he sleeps overnight in the cab of the transporter so that the car is effectively never out of his sight. If anyone needs to use his services I can thoroughly recommend him.
So after 6 years VAL is once more back in my garage awaiting more tender loving care. Tanya had hoped I could get her back on the road for her 50th birthday in August but I think that is a bit unrealistic. I soon got the car running again with bit of timely help from John Maxwell. After struggling for over a day, during which I stripped and cleaned the carburettor and fuel pump, he just sat in the driver's seat and pressed the starter button and the old girl promptly burst into song. I suppose I was fortunate to witness a kind of miracle. The upholstery has been cleaned and now only needs a little more attention. Some of the carpeting will have to be replaced as it is badly stained and the headlining has come loose in one corner but can easily be rectified. Over the coming months I shall systematically fix her ailments and eradicate any rust that I may find. The task ahead will be a "picnic" compared to the original restoration. I hope to report on my progress as time goes by. It is great to be back!
The passage of time, together with the damp and grime, has meant that the interior of VAL once more smells like an old car. This is not an unpleasant smell and was lost during the original restoration process. Alas, like the proverbial "new car smell", it is not yet something you can buy in an aerosol can!
Second Time Around (Update 1)
by Mike Johnson
[When I last reported on the second restoration of my 1952 Split ‘Val’ the body and chassis had been separated and completely stripped of all the ancillaries]
During the autumn I pressed ahead with work on the bodyshell. I removed every bit of paint from the underside, which included the bottoms of the sills, the compartment under the petrol tank and the area under the rear seat immediately over the gearbox. This was rather difficult, as most of the time I had to lay on the ground and work above my head. Using a wire brush or abrasive discs on an angle grinder to remove the paint was obviously not a safe option and was also largely ruled out by poor accessibility. Similarly, the use of paint stripper was a non-starter, so I had to revert to a technique employed by professional restorers on cars with bodies made of glass fibre or alloy i.e. using a blunt scraper to remove the paint. This was a very laborious task to say the least but very effective as all the paint layers were removed simultaneous, although the paint fragments got everywhere.
I was relieved to find virtually no corrosion under the paint that I removed and any rust that did reveal itself was easily eliminated with repeated applications of ‘Hammerite’ rust removing gel. When the gel had done its work the affected areas were then treated with the phosphoric acid based preparation ‘Jenolite’, which highlighted any remaining rust pits in need of further treatment. With the whole area rust free it was sanded with coarse emery cloth, degreased with white spirit and a strong industrial detergent and then painted with two thin coats of ‘Bondaprimer’ anti-rust primer. This was given two weeks to dry thoroughly before being covered with several coats of black cellulose enamel.
It was never my intention to strip the entire bodyshell to bear metal, as it had been grit blasted during the first restoration. Any new rust spots would most likely be caused by damage to the paintwork that had been ignored, so these areas were treated as described above. As a precaution though, I also removed the paint from all the various welded seams on the body and where the external panels had been attached, as these areas were also potential sites for any new problems. My efforts at rust prevention all those years ago (late 1980’s) had been very successful as, apart from around a few wing bolt attachment points and where the running boards were bolted to the sills, the dreaded rust bug was virtually absent. Any traces of rust that were discovered were eliminated and the affected areas spot primed with anti-rust primer.
The work on the body took several months to complete and it wasn’t until the end of May that I could turn my attention to getting the chassis sorted out. This had been languishing on the garage floor and by now was filthy due to an accumulation of dust, grime and what have you.
Apart from a few damaged areas on the underside, caused either by stones or the careless use of a jack, and where the front axle had been attached, the only other rust I discovered was on the topside of the floor immediately in front of the battery tray. At first I thought this might be due to acid spillage or a faulty or non-existent grommet surrounding the cables entering the car behind the battery, allowing water to enter the car, but later when I came to refit the body I was to discover the real reason.
I was also concerned about the four M10 studs, which are welded into the floor and hold the wing nuts securing the front seats. The metal around these had seen better days so I decided to have the affected areas cut out and new studs welded in place. The services of young Tom, my welder, were once more needed. He cut the affected areas out with an angle grinder and fashioned some repair sections out of 1.5mm thick galvanised plate, each complemented with a 2mm thick reinforcement plate. A hole was drilled through each and an M10 x 50mm setscrew welded neatly into place. After the four repair sections had been fitted the welds were ‘dressed’ with an angle grinder and the resultant joins in the chassis floor were virtually invisible. To make sure everything was aligned properly and that the seats would fit afterwards, I had carefully made a template to ensure the new studs were located in exactly the right places.
It was time for the chassis to go for grit blasting to remove every trace of the old paint, rust, grime and glue from where the carpets and sound deadening had been attached. All the various ‘holes’ in the chassis were sealed up, either with bolts in the various threaded holes or with rubber bungs, pieces of wood or thick pieces of rag. The grit is applied under considerable pressure, so I was trying to prevent it from doing any unwanted damage or getting where it wasn’t wanted, particularly the various metal conduits that run along the inside of the central ‘tunnel’, as these were full of grease. If they had got contaminated with grit I would have been in real trouble, as they would have been almost impossible to clean out again. I left the rear spring plates attached, as they are difficult to replace correctly afterwards, but the cover plates on the rear torsion bar tubes were removed. The spring plates were secured in place with bolts and enormous washers just to be on the safe side.
Now how was I going to get the chassis to blast cleaning facility? I didn’t have a suitable trailer, nor a car fitted with a tow bar for that matter, so I enlisted the help of the local landscape gardener (who happened to be Tom’s dad). He had such a trailer and a Range Rover to tow it with. Both the trips, to and from the girt blaster, where relatively uneventful and thankfully on both the days it did not rain. I must admit when we stopped at traffic lights we got some puzzled looks from a few of the other motorists. There are still those who believe that anyone who spends time trying to restore old cars must be certifiable.
Immediately after the grit blasting was completed at the workshop the whole chassis was sprayed with ‘Trimite’ red oxide etch primer. This paint dried very rapidly and is totally impervious to moisture thereafter, so any subsequent painting could be done at my leisure. The finished article looked magnificent.
When I had acquired the chassis during the first restoration, parts of both rear floor sections had been repaired and I was concerned that the welds might have be damaged by the grit or rust might have started under the various layers of paint and filler that had been subsequently applied. After blasting there were a few tiny holes that had appeared in places but all of the previous welding repairs had been unaffected and needed no further attention. The welder returned a few days later and made all the necessary minor repairs, which took him far less time to do than it did to set up his equipment.
The cost of this work on the chassis was about ₤330 i.e. ₤175 for the blast cleaning and etch priming, ₤10 for the metal plates and set screws, ₤20 for the etch primer, ₤50 for transportation and ₤75 for the welding repairs.

The chassis after grit blasting and etch priming
It was now time to paint the chassis. A tiny amount of plastic filler was necessary in a few places, purely for cosmetic purposes and then two thin coats of ‘Bondaprimer’ were applied and left at least a week to allow them to dry properly. I then sprayed on several coats of the same black cellulose enamel paint used on the underside of the body. When dry the paint finish looks like black glass, such is the shine.
After painting, the underside of the chassis looked great but disaster was to strike when I repeated the process on the topside. As the last coat of black cellulose was applied the paint began to wrinkle and craze (schear) in several places, not just the odd blemish, but very much like furrows in a ploughed field. The solvent in the paint must have re-activated the undercoat and I concluded that either I had used too much thinner in the paint mixture or had held the spray gun too close to the surface whilst spraying. When dry, the paint becomes so hard that trying to flat it by the conventional use of abrasive paper is just not possible, so the whole top surface would have to be completely stripped and painted all over again. The air was blue and that feeling of despair was with me once again!
After a few days, when I had calmed down and suicide no longer seemed a necessary option, I bought a 2.5 litre tin of Nitromors paint stripper and set to work. This was a hazardous and labourious task, which took the best part of three days to complete. By way of consolation I found that the grit blaster had done his work very thoroughly, as I didn’t find a single trace of rust on any of the areas I treated.
After the paint stripper and debris had been removed with a scraper the surface was scrubbed repeatedly with wire wool using hot detergent, and then clean water to remove every trace of the chemicals and so avoid any problems when applying new paint. The clean metal was treated with Jenolite and then left to dry overnight. The whole lengthy painting process then had to be repeated, with breath held I might add. This time I put the black topcoat on with a fine haired brush instead of using a spray gun and to my great relief all went well.
When all the paint is fully hardened, the next step will be to fit the body back on the chassis using the reverse of the procedure I adopted to separate them. Then it will be time to fit the gearbox/transmission, front axle, braking system, control rods and cables and the suspension. But that, as they say, is another story.
Back
After painting, the underside of the chassis looked great but disaster was to strike when I repeated the process on the topside. As the last coat of black cellulose was applied the paint began to wrinkle and craze (schear) in several places, not just the odd blemish, but very much like furrows in a ploughed field. The solvent in the paint must have re-activated the undercoat and I concluded that either I had used too much thinner in the paint mixture or had held the spray gun too close to the surface whilst spraying. When dry, the paint becomes so hard that trying to flat it by the conventional use of abrasive paper is just not possible, so the whole top surface would have to be completely stripped and painted all over again. The air was blue and that feeling of despair was with me once again!
After a few days, when I had calmed down and suicide no longer seemed a necessary option, I bought a 2.5 litre tin of Nitromors paint stripper and set to work. This was a hazardous and labourious task, which took the best part of three days to complete. By way of consolation I found that the grit blaster had done his work very thoroughly, as I didn’t find a single trace of rust on any of the areas I treated.
After the paint stripper and debris had been removed with a scraper the surface was scrubbed repeatedly with wire wool using hot detergent, and then clean water to remove every trace of the chemicals and so avoid any problems when applying new paint. The clean metal was treated with Jenolite and then left to dry overnight. The whole lengthy painting process then had to be repeated, with breath held I might add. This time I put the black topcoat on with a fine haired brush instead of using a spray gun and to my great relief all went well.
When all the paint is fully hardened, the next step will be to fit the body back on the chassis using the reverse of the procedure I adopted to separate them. Then it will be time to fit the gearbox/transmission, front axle, braking system, control rods and cables and the suspension. But that, as they say, is another story.
Second Time Around (Update 2)
by Mike Johnson
[When I last reported on the second restoration of my 1952 Split, 'Val', the chassis and the underside of the body had been completely restored and re-painted.]
Since then quite a lot more progress has been achieved. The body and chassis have been re-united and the front axle and gearbox re-instated. This was all achieved single handed apart from replacing the front axle, which was really too heavy and unwieldy to handle on by own. With all the wheels back on, 'Val' is beginning to look more like a real car again instead of a seemingly limitless collection of parts. This process 'should' have been relatively straight forward (where have I heard that before) but typically was not without problems and some drama.
The first part of the process was to replace the gear shift selector rod and the handbrake push rod inside the central tunnel of the chassis. Both these tasks are far easier to do at this stage but none the less are still awkward. The gear shift rod has to pass through a circular guide bracket, which is located on the inside of the tunnel just to the rear of the gear lever hole and refitting the handbrake push rod necessitates connecting it up to the handbrake lever. Both these tasks were quite tedious and frustrating. A new master brake cylinder was then fitted as were all the brake lines. These were a set of copper pipes with brass unions that I obtained from 'Automec'. They were expensive but look fabulous and are immune to corrosion.
The chassis was fitted with a new rubber seal. This comes in a single continuous length but must be carefully cut into a number of separate strips. Great care is needed here, as there is only just enough for the entire job. From the factory this is hammered into place with some dreadful helical chassis nails. The chassis was already drilled with holes to take these but, to me, these create instant sites for corrosion and are a constant hazard to your fingers when working under the car. Therefore instead of these I used the nylon clips used on the door seals of 1303 Beetles and early Golfs. These do not break the paint film and won't lacerate the fingers of the unwary. The rubber seal was then carefully pierced in the designated spots for the body to chassis securing bolts.
With the body back on the chassis there are then 34 bolts to locate and tighten. Along each sill there are nine M8 bolts, each with their own reinforcement plates. There are another two pairs of these inside the car, on each side of the central tunnel under the back seat, making 22 such fasteners in all. These bolts are pointed to help guide them into place through the holes made in the rubber seal. At the Slough Swapmeet, I had managed to get hold of a complete kit of these made from stainless steel, which are far superior and cheaper than the plated originals, which soon corrode. There are then two M10 bolts that screw into the top of the front axle, just behind where the spare wheel sits, and another of the same size in the rear wheel arches next to the shock absorber mountings.
Again under the back seat, there are 2 more M1 0 bolts on either side, and a further pair beneath each door pillar. These latter ones can be very difficult to align, as they fit into captive plates in the base of the door pillar, which are loose and can easily get misaligned or bunged up with dirt and paint. I find it best to locate these first, by using very long bolts, M10 X 80mm, and once everything lines up properly replace them with correct M1 0 x 50mm ones.
I started by fitting all the M10 bolts, but found that the body would not sit centrally between the two 'horns' of the front axle. I am reliably informed that this is not unusual, as the body can distort whilst off the chassis and in the '50's the alignment probably wasn't that precise in the first place. Having achieved the best possible compromise, all of the M1 0 bolts were tighten and I set about the marathon of fitting all the M8 bolts, along the sills and under the back seat. As I lay on the cold garage floor under the battery compartment I was quietly relieved when the last bolt went into place. This feeling was quickly replaced with one of shock and horror as I could see a chink of daylight between the rubber seal and the body. There was an obvious gap, which could not be closed by tightening the bolts any further. This gap must have been there after the first restoration and, having let water enter the car, explained the patch of rust that had formed on the inside of the floor in front of the battery. There was only one thing to do, the body and chassis had to be separated again and a copious amount of black sealant injected into the gap. With the body back in place the gap was closed and all the 34 fasteners had to be tightened again. This was where the second calamity occurred. One of the captive nuts in the sill sheared with a sickening crack. This left me with a bolt, which could neither be tightened nor removed.
Not only did the captive nut turn as I tried to tighten the bolt, but it emitted a sickening grating noise. My first though was that the sill was full of rust and that all my worst fears would be realised. The body would have to taken off yet again and more welding and painting would be necessary! This prompted a retreat to the house, a cup of tea and the donning of my thinking cap.
After a while I hit on a possible solution to my dilemma. If I cut a small inspection hole in the sill on the inside of the car, where the carpet is attached, I might be able to get an open ended spanner onto the nut? It would depend on whether the metal duct, which runs down the inside of the sill, would allow this. Having cut a very neat rectangular hole about 3 cm long by 1 cm high in the sill, I was relieved to find that this idea worked. I managed to get a spanner onto the nut and remove it. It was then a simple task to fit a new nut and washer (made of stainless steel like almost every other fastener on the car), and tighten the bolt down. I also discovered the reason for the grating noise when the nut broke free. It wasn't due to rust, but the presence of grit left over from way back in 1988 when I had the entire bodyshell grit blasted, 'first time around'. The interior of the sill was completely rust free.
With 'Val' looking more like a complete car again, my next step was to replace the rear panel or 'H' valance. Readers may recall that this part of the car was badly corroded and, to eradicate the rust completely, removing the panel was the only option. It was held in place by a series of spot welds down each side, which were taken out with a drill, and four small tack welds inside the engine compartment, which were carefully removed with an angle grinder.
Like many Beetles of her era the rear panel had been 'butchered' at some time so that a starting handle could be fitted. This had not been done in a neat or sympathetic fashion, as a crude rectangular shaped hole had literally been 'hacked' out of the panel. During the first restoration my original welder had done a neat job patching up the hole, but to get a smooth finish a lot of lead and filler had to be used. Not ideal here, as the heat from the exhaust system can soon cause the paint to crack. Also, part of the all important 'H' pattern had been damaged so, 'second time around', I decided to try and obtain a new panel.

The centre section of the original rear valance had been cut to fit a starting handle. The pattern of the crude rectangular hole can still just be seen and, despite being expertly repaired, the damage to the H pattern and the bracket that holds the engine cover catch are still evident. This could be further disguised with filler but was not the preferred option on this occasion.
Obviously none of the usual sources could supply such a panel and those from later cars are the wrong shape. Trying to find an NOS item was pointless, as in nearly 30 years of attending shows in the UK and in Germany I have never come across one. By comparison, skips loads of the proverbial hen's teeth or piles of rocking horse poo are quite common. This meant either finding a good second hand item, i.e. one cut from a similar vehicle, or a good quality reproduction item. I chose the latter option. Wolfparts in Sweden supply such a panel but the pictures on their website suggested that this was only the outer skin and with currency change and carriage it would have cost well over £300.
This prompted me to contact club member Wolfgang Gips, who frequently advertises parts for sale in the magazine. As luck would have it, he had such a panel, which he had obtained in Germany for a Type 82e he is restoring. However, Wolfgang had a change of heart and decided he wanted to restore the old panel instead. I can understand this view as, with some restorations, and 'Val' is a typical example, you can end up replacing so much that you wonder if it really is the same car anymore. If possible, it is better to retain and repair the original part even if the result is not perfect. However, on my car, the original item really was too rough to put back. The new panel cost me about £250.
Even with this high quality reproduction item, fitting was not to be straight forward. Although the outer skin was near perfect in every way, I discovered that the inner support section, which is to be welded to the inside of the engine compartment, was not the correct shape and would not fit. The curvature profile was wrong and modification seemingly impossible. To remedy this situation would take some radical and potentially foolhardy action. The outer and inner sections of the panel can be separated, but are held together by no less than 24 spotwelds. Removing these myself was not an option, so I took the old panel to a local body shop. Here they used a special 'cobalt' drill to remove the spot welds. This cut through the upper layer of metal on the outer skin leaving the inner support section undamaged. This cost me about £32 to have done and they made an incredibly neat job of it.
Back home it was now my turn to 'kill or cure'. With much trepidation, I took my trusty angle grinder and, using a very thin cutting disc, cut away the inner part of the new panel. This was done in way that left the lip to which the inner section was welded intact on the outer section. I knew that if this went wrong, a lot of money would be 'going down the tubes'. My gamble worked, so I now had the original inner panel, which was reusable, and a new outer panel to fit to the car.
A few days later the welder came back to the house again and both sections were welded into place separately. I decided not to reinstate the 24 spotwelds joining the two sections, as there was no way this could be done neatly without very special equipment, so these will be held together with seam sealer. As I reported to Wolfgang sometime later, the finished result looks 'wunderbar' and well worth all the effort and expense.
With the rear panel welded into place, the next task was to go over the entire body shell, both inside and out, and meticulously fill and smooth out any imperfections and get it all into primer. By the time all this was done it was late autumn once again, so work had to be suspended for yet another winter. Alii will have to do then is to spray on the top coat of paint and that is when the real frustration and grief start. And I (we) do all this for enjoyment!!
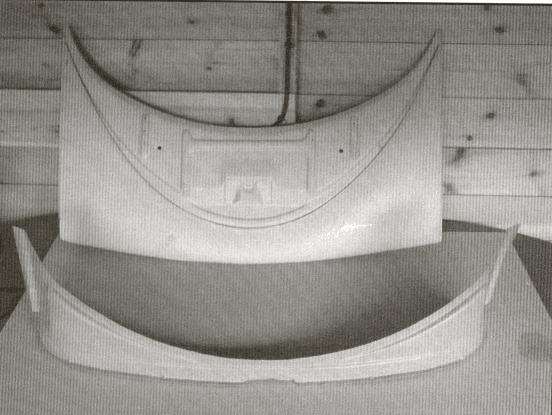
In the background, the outer skin cut from the new reproduction panel and, in the foreground, the inner section salvaged from the car's original panel
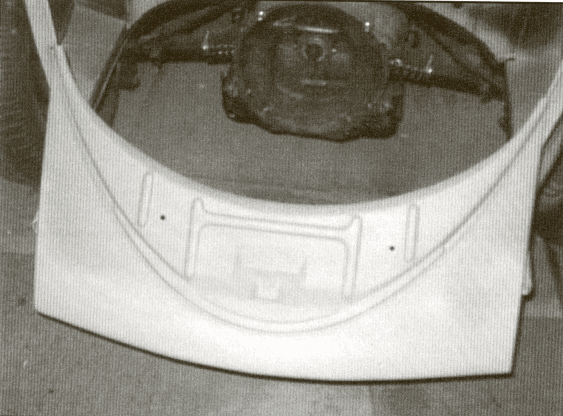
The finished product after the two separate sections had been welded into place and the area prepared and primed. 'Wunderbar'!
Back
Second Time Around (Update 3) by Mike Johnson
The second restoration of my 1952 split rear window Beetle, 'Val', drags on, but I have at last cured the problem of the badly warn hinge pins on the two doors.
All Beetles will eventually suffer from this malady and, if the wear becomes too extreme, problems will be experienced with door closure or the door catching on the sill. Where the wear is slight it can be mitigated by 'packing out' one of the hinges where it is bolted to the door pillar, but this is only a short term 'bodge'.
To remove the pins, Volkswagen garages used a custom made hinge pin extractor tool and some workshop manuals picture it in operation. It clamps onto the hinge with a simple screw-claw mechanism and a screwed shaft is then used to press out the pins from below. I found this device impossible to use, as did the person I subsequently sold it to and the person who later bought it from him.
With the doors removed from the car it should be possible to knock the pins out with a long drift and a club hammer, but all my attempts to do so were unmitigated failures. The pins are an incredibly tight fit and take a lot of force to knock them out. Just as well I wasn't worried about the paintwork on the doors, as both this method and using the VW tool can lead to considerable damage.
Deciding to break with tradition and enlist professional help, I sort the assistance of a local body shop that have an excellent record for quality work. Unfortunately they also failed to remove the pins using their own extraction tool, which got bent in the process. Next up was a young man who runs his own small auto repair business in the next village. He has done a lot of useful work for me over the past years including rebuilding my steering box and re-threading the shock absorber mounting points on the front axle beam, and he does all the work on my everyday cars that I cannot manage myself.
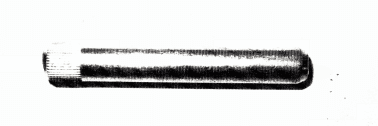
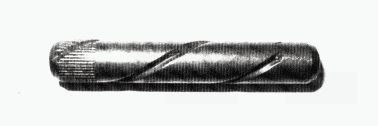
He took only a short time to warm up the hinges with a blow lamp and, with a few inoffensive taps with a drift and hammer, the old pins were out. What a sorry sight these were (see picture), two were very badly corroded, a third was badly pitted, but the fourth looked reasonably new. In addition, once the pins were removed it was obvious that the hinges themselves were also badly worn. Trying to fit new standard sized pins to them proved a waste of time, as these were woefully loose and did not cure the problems. The only commercially available oversized pins I could obtain (1 mm or 2 mm oversized) are for later Beetles and are arguably slightly too short. Anyway, this would not cure the problem with the ware in the hinges themselves. So, some progress, but some way still to go.

The four 'original' pins extracted from the door hinges.
My next move was to consult a local engineering workshop that seemed to think the job was quite straight forward. They would ream out the hinges and manufacture some oversized pins on a lathe. The original pins are manufactured with a conical 'hat', which assists in their fitting and also stops them working their way out of the hinge. Security is also enhanced by the tiny raised 'splines' on the upper portion of the pins that are machined into the original items and the commercially available replacements. However, this sort of pin would have been very expensive to manufacture and, in my opinion, the conical 'hat' portion could make effective lubrication of the hinge difficult.
So, originally having to take a back seat again, I elected to have some much more straight forward pins fashioned, which were made of stainless steel and very slightly tapered from top to bottom, so as to stop them falling out. The workshop also fitted the pins for me.
Having any custom made parts manufactured and fitted is never cheap and this occasion was no different. However, now the work is done, what a wonderful difference it has made. I'm sure the initial shock and pain of the cost will soon fade and I shall never regret having the work done properly. Another small step forward on a very long and difficult road.
Having any custom made parts manufactured and fitted is never cheap and this occasion was no different. However, now the work is done, what a wonderful difference it has made. I'm sure the initial shock and pain of the cost will soon fade and I shall never regret having the work done properly. Another small step forward on a very long and difficult road.
Standard size replacement hinge pin - non original
Oversized hinge pin for later cars - genuine VW
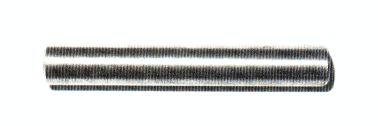
Custom made oversized tapered hinge pin made by local engineering workshop
Back

Copyright © 1974-2024 The Historic Volkswagen Club